If you haven’t done so already, you will need to export your SSL certificate from your Windows Server to a .pfx file. Be sure to review that link, it’s important to do the .pfx export step just right. If you don’t own an SSL Certificate yet, I recommend NameCheap, the banner below will usually give you a good discount.
Now that we have a good .pfx certificate file, we can begin working on importing the cert into the Citrix NetScaler:
Logon to the Netscaler and click SSL Certificates > Import PKCS#12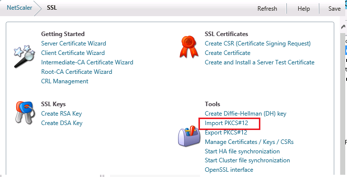
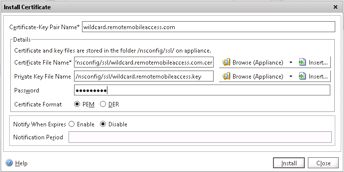
The output file name can be anything you like, however be sure to take note of it. wildcard.remotemobileaccess.key is used in the example. The .KEY file will contain both a Private Key as well as the Certificate combined into one file.

A file has now been created on the NetScaler called “wildcard.remotemobileaccess.key”
![]()
Install WinSCP, connect to the IP address of the NetScaler. Click the double dot to get to the previous directory. Browse to /nsconfig/ssl. We are now going to create a new .cer file and modify the wildcard.remotemobileaccess.key file:
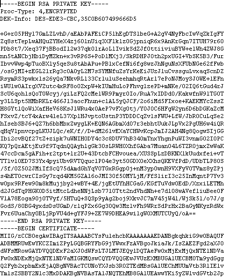
1) Edit the .key file with WinSCP
2) Select everything starting from —–BEGIN CERTIFICATE—– to the end of the file. Click Cut. Leave the file open.
3) Open a new file on your desktop, name it whatever you like, except make sure the extension is .CER and not .TXT. Paste the information you cut out of the .key file in step 2. Save and close the .CER file you created and drag and drop it into WinSCP so that its uploaded into the nsconfig/ssl folder on the NetScaler
4) Save the modified Key file from step 2 using the save button in the WinSCP file editor.
You now have both a .key file and .cer file on the Netscaler and can continue with the certificate installation process. Click SSL > Certificates > Install
If you have not previously installed the intermediate certificate chain from your Certificate Provider (like GoDaddy), then you will need to do that (SSL > Certificates > Install).
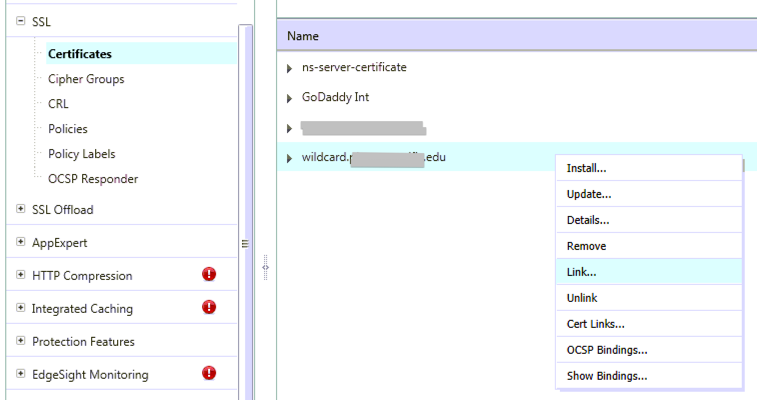
We now need link the new SSL Cert that you installed to the Certificate Chain from your CA:
Here are the locations of the services where you may need to apply the new certificate:
SSL Offload > Virtual Servers
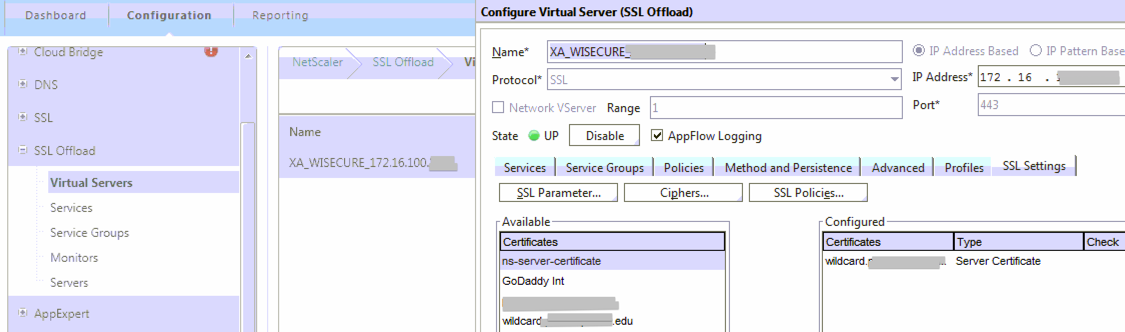
SSL Offload > Services node > there is an Internal Services tab on the far-right, bottom of the page. These services should also be changed to use the new Wildcard cert.
Access Gateway > Virtual Servers
Load Balancing > Virtual Servers
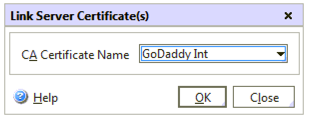
Linking your intermediate cert: SSL Offload > Certificates > Chose the new certificate > click the ‘Link…’ button at the bottom of the window. In the dialog that opens, choose the Intermediate certificate, click Ok. Check replicate to HA Partner if you are running High Availability NetScalers in your environment.
Remember to save your Running Configuration (if you click ‘dashboard’ you will be prompted to save your running configuration).
Testing
- To test SSL Offload connect to your Citrix web address from inside the network to see if you get a certificate error in your web browser and also click the lock in your browser to see what Cert is being used
- To test Access Gateway connect to your Citrix web address from outside the network to see if you get a certificate error in your web browser and also click the lock in your browser to see what Cert is being used
Troubleshooting
When you go to add the cert to various services you may receive a Warning “No usable ciphers configured on the SSL vserver/service”.
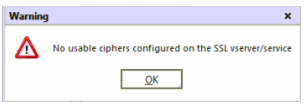
I’ve been told this is normal and its simply letting us know that while the old cert is removed and the new one is being loaded there is no cipher in use during that moment. I would open the service again to verify it actually shows your new Certificate, and if it does you should be good to go.
I have read that this error can also occur if there is a problem with the private key. If this happens just try repeating the “Install Certificate” process again. If you are still having issues then repeat the Import Certificate AND Install Certificate steps. Still having issues? Make sure your .PFX that you exported had that “export private key” checkbox checked. Try re-exporting to .PFX again and repeating the steps.
Very helpful. Try to add more screenshots while explaining.
The whole “edit file” thing you don’t have to do..
******
1) Edit the .key file with WinSCP
2) Select everything starting from —–BEGIN CERTIFICATE—– to the end of the file. Click Cut. Leave the file open.
3) Open a new file on your desktop, name it whatever you like, except make sure the extension is .CER and not .TXT. Paste the information you cut out of the .key file in step 2. Save and close the .CER file you created and drag and drop it into WinSCP so that its uploaded into the nsconfig/ssl folder on the NetScaler
4) Save the modified Key file from step 2 using the save button in the WinSCP file editor.
*******
you can select on both entries the same file, you don’t have to split up them.