Below is what you need to know about Share and NTFS Permissions including a step-by-step example of the most common use case.
How NTFS and Share Permissions Work
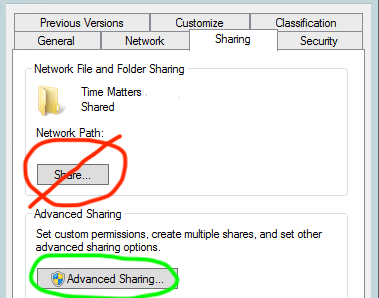
When you right click on a file or folder in a Windows server environment you will notice the “Share” tab and “Security” tab. The Share tab > Advanced Sharing represents the Share permissions and the “Security” tab represents the NTFS (or referred to as “file permissions”).
How Permissions Work in Windows File Sharing (Share and NTFS Permission):
Share permissions are permissions to a network ‘door-way’ and only apply to connections to a network share \\servername\sharename. A network share is a doorway to access data over the network. Share permissions regulate access to this doorway. Share permissions only apply when accessing the files through the Share.
NTFS Permissions are applied directly to the files and folders themselves, and are written *to* the files and folders. Therefore NTFS Permissions take effect regardless of how the files are accessed, locally or through a network share.
Note: NTFS Permissions are commonly referred to as “File Permissions”, and are accessible through the Security tab of a file or folder properties.
How Permissions get applied to users:
Share and NTFS Permissions can be applied directly to a users account or via trickle down from security groups the user may be a member of.
How NTFS and Share permissions are combined (most restrictive wins):
NTFS and Share permissions can be thought of as as “gates”. A users effective permissions are a combination of the Share permissions (Sharing Tab) and the NTFS permissions (Security Tab) with the least access permission taking precedence. NTFS and Share Permissions are combined such that the user effectively receives the most restrictive of the two permissions – if either gate obstructs access, there is no access.
How multiple sets of permission are combined to determine a users access token (most access wins):
A users effective access is determined by a combination of the permissions assigned directly to their user account and any groups they are a member of. This is the inverse of how NTFS and Share permissions combine. A users assigned permissions are combined such that the users effective permission is the greatest permissions allowed out of all permissions assigned, with the exception of the “no access” permission which always overrides. For example: If a user is a member of the accounting group which has been assigned modify permission to the accounting folder and the user is also a member of executive team group that has been assigned read permission to the accounting folder, the effective access is “modify” since modify is the greatest of the combined permissions assigned.
How to successfully apply NTFS and Share permissions in practice:
General Practice regarding Share Permissions:
Share permissions (Share tab > Advanced Sharing) are left ‘wide open’ giving either Domain Users or Everyone Full Control, this is the default setting in Windows.
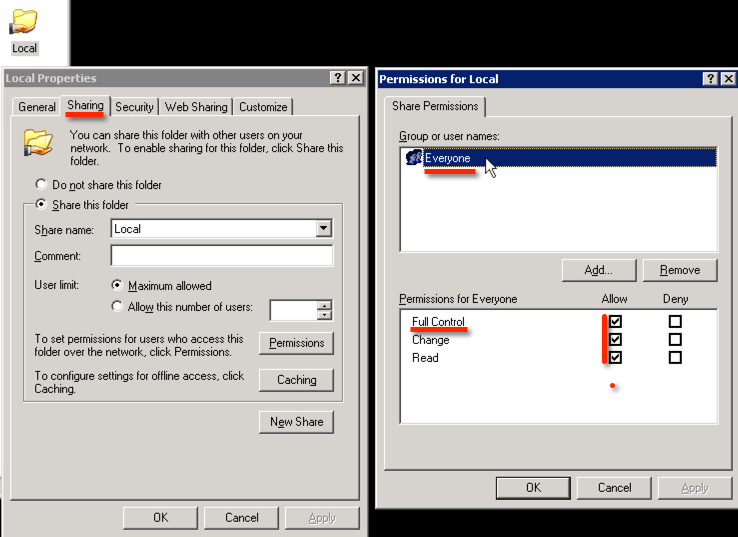
Where permissions are then restricted is using the NTFS permissions (Security Tab) to restrict the permissions down to the permissions desired by adding the individual users or groups that should have access, generally granting either ‘Read’ or ‘Modify’.
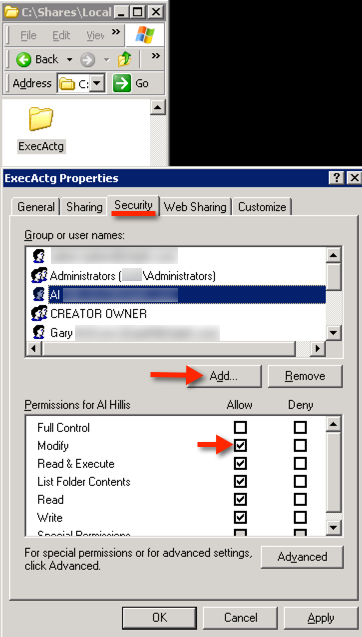
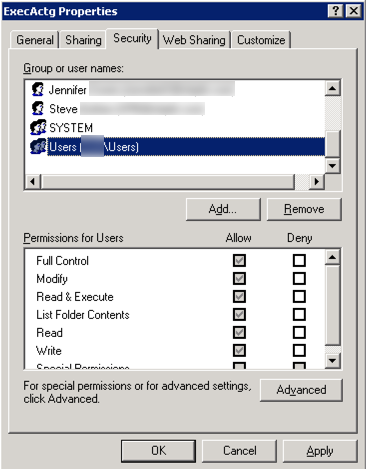
To add someone to the NTFS permissions list: click the Security tab, click Add and input their username. By default they will be granted the ‘Read’ permission.
In this example the user should be given ‘modify’ rights so they can write to files.
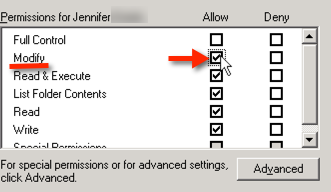
In order to grant the ‘Modify’ NTFS permission: simply click the Modify checkbox in order to change the permissions from ‘Read Only’ to ‘Modify’:
Removing any default or inherited ntfs permissions so that the desired permissions take affect:
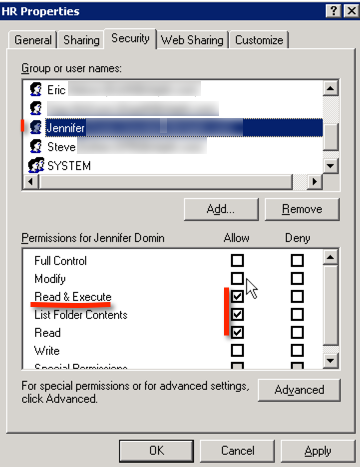
It may be necessary to remove default permissions that are being inherited down to the folder you are intending to secure. In most cases, you will remove the default Everyone, Users and Domain Users groups from the NTFS permissions list (security tab) by selecting the aforementioned Group and clicking the Remove button. If the inherited permissions remain in effect it defeats the whole purpose of restricting permissions on your folder.
Note: In many cases the Users group is being inherited from the root of the drive and it’s permission checkboxes are greyed out and inheritance must be disabled in order to remove the inherited permissions.
In order to remove the inherited Users group from the permissions you need to turn off permissions inheritance on the folder.
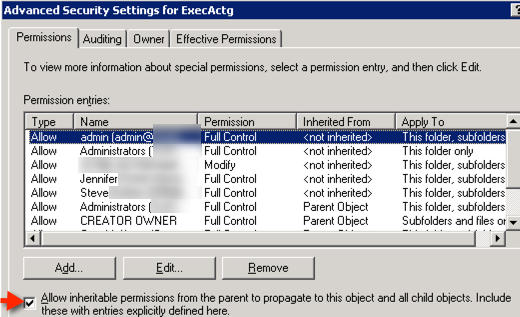
How to turn off ntfs permission inheritance:
Click Advanced > uncheck “Allow inheritable permissions from parent to propagate to this object and all child objects”
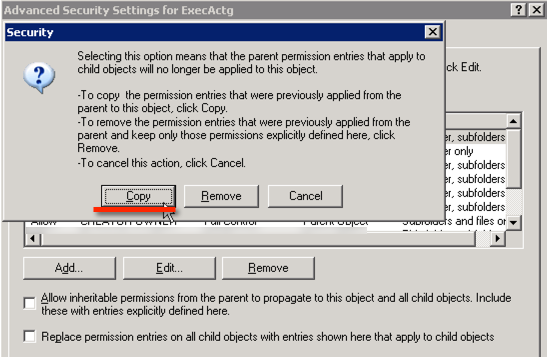
I recommend clicking “Copy” when prompted in order to copy any inherited permissions as there will be less chance of inadvertently breaking things.
Select the Users or Groups you wanted to remove from the ntfs permissions and click the Remove button.
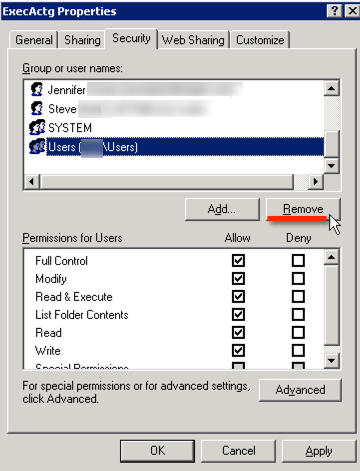
Click OK.
You have now successfully limited the access to the folder.
New server deployment tip: When new servers are initially deployed, I suggest removing the default Everyone, Users and Domain Users groups from the NTFS permissions list (security tab) on the root of each drive. This way these permissions do not apply to every subsequent folder you create requiring you to constantly disable inheritance.
Appendix
Warning: Never use the “Share…” button on the Share tab, this launches a confusing and dangerous wizard that will modify BOTH the Share and NTFS Permissions causing unintended consequences.
Note: never click ‘cancel’ while permissions are applying as it will corrupt the permissions. If you make a mistake, let it take it’s course and complete and then correct the permissions and apply them again.
Additional Resources:
- How to show open files on Windows Server 2003
- How to list the shares with folder path on Windows Server 2003
- default NTFS permissions in Windows
Tools:
- Simple, fast, and compact folder permissions analysis with TreeSize
- SolarWinds Free Permissions Analyzer