If you don’t own the paid version of VMWare ESXi or have VCenter you can still create ‘templates’ and clone them when you need additional VM Guests. The process has to be completed from the CLI which is less convenient than through the VCenter GUI.
Note: I found many instruction sets which show copying the VMWare VMDK’s using datastore browser and then renaming them to your new server name however that approach has several drawbacks.
NOTE: If you are cloning a Windows Guest VM make sure you run Sysprep and then shutdown the Guest, amongst other things this prevents the ‘ghosted NIC issue’.
First we need to create a new folder for the new server VM’s VMDK and other files, we also need to note the path of the VM that we are cloning
1) Open DataStore browser and browse to where you keep your VM’s
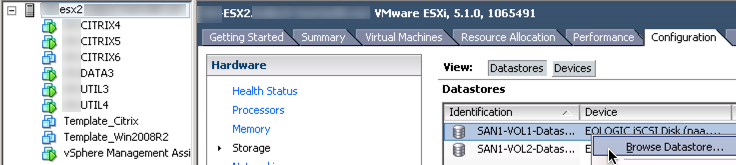
Click ESXi Host > Configuration tab > right-click Datastore and click ‘Browse Datastore’
2) Note the path of the template VM VMDK files that you are planning on cloning.
3) Right click inside Data Store Browser and click ‘New Folder’ I’m calling the folder “NEWSERVER”. note the path to the Virtual Machine ‘template’ that you are cloning.
Next we need to clone the template VM VMDK files to the destination new server VM:
1) Connect to the ESXi Host Console CLI via PuTTY SSH session to your ESXi Hosts IP address.
**First you may need to Enable ESXi Shell access using the vSphere Client:
Use the vSphere Client to enable local and remote access to the ESXi Shell:
Log into a vCenter Server system using the vSphere Client.
Select the host in the inventory panel.
Click the Configuration tab and click Security Profile.
In the Services section, click Properties.
Select SSH from this list and start the service.
Modify the following command to match your folder path’s and source and destination VM names and then paste the command into your CLI session:
vmkfstools -i “/vmfs/volumes/SAN1-VOL1-Datastore1/Template_Win2008R2/Template_Win2008R2.vmdk” “/vmfs/volumes/SAN1-VOL1-Datastore1/NEWSERVER/NEWSERVER.vmdk” -d thin
I frequently get the error “DiskLib_Check() failed for source disk The system cannot find the file specified (25).”
To work around this, I browse with cd and ls commands to get into the folder with the .vmdk file that I’m cloning and then I use the following modified command:
vmkfstools -i “Template_Windows2012 R2.vmdk” “../AzureADConnect01/AzureADConnect01.vmdk” -d thin
Note: You may need to remove and retype the quotes as the copied quotes above may not work (weird formatting may be retained if you copy the command from the web).
On my environment I have a separate VMDK disk for the swap file so I cloned that as well:
vmkfstools -i “/vmfs/volumes/SAN1-VOL1-Datastore1/Template_Win2008R2/Template_Win2008R2_1.vmdk” “/vmfs/volumes/SAN1-VOL1-Datastore1/NEWSERVER/NEWSERVER_1.vmdk” -d thin
Now we will go back to the VMWare Client and create a new Virtual Machine using the cloned VMDK’s from the previous steps
1) Right Click ESX Host, Create new virtual machine, select custom, select the datastore that contains the VMDK you cloned. Proceed through the hardware settings and choose your preferences (I try and choose the same NIC and Controller type as the VM that I cloned.
At the ‘Select a Disk’ section, choose “Use an existing virtual disk”.
At the ‘Select Exist Disk’ portion, click Browse at the Disk File Path dialogue and select the NEWSERVER.VMDK or whatever name you chose in the first vmkfstools command.
Continue through the wizard to create the Virtual Machine and you are all set!
Ghosted NIC Hotfix:
https://support.microsoft.com/default.aspx?scid=kb;en-US;2344941